Friday, June 22, 2012

{DIY Wubba nub: meet "wabbit"}

After the Guest post i did on Decorgreat, my inbox blew up with emails from mamas asking me how i made my own "Wubba nub"
So i thought i would write up a quick tutorial for this easy project!
 {Plus it was time to make another one for G, her "wabbit" was getting pretty gross}

We tried the real wubba nub u can buy in stores, but she HATES the soothie pacifier
We can only get her to take the MAM Latex paci's
Soooo we thought we would get creative & make our own
It has been the best thing we have ever done

We've ben using our homemade Wubba nub since she was about 3 or 4 weeks old. 
We call it her "wabbit" 
She loves it!
She has it with her almost always.
She snuggles wabbit during the day, & sucks on the atatched paci from time to time. 
At night & during naps she sucks on the paci & cuddles her lovey wabbit

She has a friend to take everywhere 
new situations arent scary, because she has wabbit
she will sleep anywhere because wabbit is there
If her paci falls out at night, she knows just where it is & puts it back in her moth & goes back to sleep
Car rides are a breeze because wabbit is there.
Going to stay with her Grandparents for a couple hours while we run errands is easy, because wabbit is there
Its something that is always consistent no matter what's going on 

Anyways, this is how you can make your own "wabbit" for your little sweetie :)
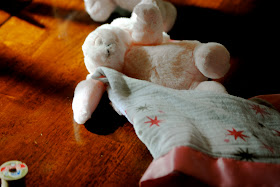
This is Wabbit
Hes pretty gross looking
He's been through a lot 
& by alot, i mean every inch of his body has been gnawed on, all day long, every day, by a teething little monster,.. for 6 months!
Time to make a new one & put the old wabbit into G's memory box!
You will need:
A small stuffed animal or a soothie/lovie
A small security blanket of your choice
a pacifier adapter for your paci of choice 
A paci {We use the MAM classic}
If you are using an already made Soother/Lovey, you can choose to leave the blanket on or put your own on.
We put our own on.
if you choose to do this, use a seam ripper to pull the blankie out of the bunnies arms
Prepare a Needle & thread
Thread about 1/4 the bunnies ear through the bottom of the Paci adapter..
Fold the 1/4 section of the ear down & use your needle & thread to hand stitch it in place.
Now fold your blankie how you want it to be
Attatch it to one hand of the bunny with your needle & thread
Now sew the other hand to the hand that has the blanket attatched to it to finish off your Lovey 
& there you go! 
you made your very own Lovey/Wabbit/ Wubbanub what ever you want to call it!
The other thing that is nice about this Vs. the wubbanub is you can Detatch the pacifier & sanitize it daily & throw the wabbit in the wash!
you cant do that with a wubbanub
Give it to your sweetie to love on through out the day 
& to snuggle with at night
I promise this simple project is one you wont regret doing! 

Happy Friday! 

{6 months of G}

{The night before she was born}
{1 month}
 {2 months}
{3 months}
{4 months}
{5 months}
{6 months}
These past 6 months we have learned so much about G, about parenting, & about ourselves.
There have been hard days & easy days
sad days & happy days
Days where we some how made it through with no more than a half hour of sleep 
nights where we went to bed with sweet potatoes in our hair & baby toys in our bed
We've watched more Yo Gabba gabba than i ever thought was possible
& weve learned what a treat it is to just take a shower!
Baby kisses {AKA baby licking your face} are sweet
Poopy diapers aren't scary anymore
baby coos & giggles are music to our ears
We've gotten used to people greeting G before they greet us {its actually pretty funny, shes a people magnet!}
we've turned into "baby talk" machines...even when were not talking to a baby
Peek a boo is the funniest thing EVER 
{& so is mommy blowing her nose}
{& daddy singing..}
{& the neighbors dog..}
Her "Wabbit" is her BEST FRIEND
Never ending laundry is part of life now it seems
& thats ok

Its all worth it! 
Giuliana is our life 
We are crazy about her 
We LIVE to see her smiling face every morning
She is so Cute & has the sweetest personality EVER! 
She is the Happiest kid i have ever seen, always smiling
She is growing so fast! I cant believe it 
I just want time to slow down, so she will be my little tiny baby forever..
But at the same time im enjoying watching her grow & learn

We love being parents
These past 6 months have been amazing
Its hard to believe that in 6 more months we will have a 1 year old kiddo
crazy

SO excited to see what adventures lie ahead
We Love you sweet little Giuliana Joy
xoxo


Tuesday, June 19, 2012

{guest post}

We did a guest post over on

Brooke is a soon to be mama {With fabulous style!} looking for advice on baby items to LOVE & LEAVE.
She asked for my 2 cents.. so, i gave it! 

Happy tuesday

Monday, June 18, 2012

{mother's milk popsicles}

Yes 
mothers milk popsicles
for baby of course :)

there are 2 different ways i make them
#1
you will need:
a milk freezing tray {i got mine at buybuy baby}
expressed milk
Basically you freeze your milk
once frozen, take out a 1 oz stick & wrap a paper towel around it
& your done! 
This option i the "more milk" option. The next option doesnt have as much milk in a serving
#2
you need:
freshly expressed breast milk
a clean ice tray
pacifiers
Fill the ice tray with the expressed milk
put the pacifiers in the ice tray slots of milk
Put the ice tray in the freezer for a couple of hours
When done, pop out the pacifer pops onto a plate
store them in a freezer safe container
I use ball freezer jam jars
Attatch a mothers milk pop to a paci keeper..
& give it to your sweetie to enjoy!
& ALWAYS always always stay near your little one when they are enjoying these, as with any food they put into their mouths. Remember, they are still learning :) 

EASY PEASY! 
They are great for little teething munchkins like G.
When she is having a fussy day, but doesnt want to comfort nurse, ill give her one of these & she LOVES it. 

Note: This is not an idea for a meal replacement. Always feed you baby the usual meals/breastmilk/formula. This is just a "snack". 

{G is almost 6 months old in these pictures, enjoying her paci pop. I would suggest waiting to try this until your baby is atleast 5/6 months old.}

Enjoy! 
Happy monday

Sunday, June 17, 2012

{daddy day}


You have been such an amazing friend
You have been an even more amazing husband
& now
You're an amazing daddy
You are just all around AMAZING!

Its so fun watching you interact with your little girl
you can tell shes crazy about you
& you are just as crazy about her

I love when she rubs her hand on your face to feel your scruffy beard
& you kiss her little hand
its just so sweet

I cant wait to see what our little family will be like 5, 10, 20 years from now! 
I love you William 


Friday, June 15, 2012

{DIY (powder) cloth diaper safe laundry detergent}

I really liked my other laundry detergent recipe for our clothes. But once i started cloth diapering, i needed something that had a little better cleaning power for the poo stains.{sorry TMI, but its true!!} So i havent been using it for months. 
We have been using Rockin green Laundry detergent for our cloth diapers & our clothes & love it! 
But it gets expensive.. like $30 a month. Doesnt sound like a ton, but it adds up over time..{about $360 a year.} & lets be real for a second, We're young, we're married, & we're parents! Lots of added expense & not a lot of extra money. We're all about quality, but not all about dishing out lots of money.. so if we find a product that is a lot cheaper that works just as well as the name band product, we're all for it! 

So, i started experimenting with some recipes i found online, trying to find a homemade detergent that i could make for a lot cheaper that works just as well!
 & I did!! 
Here is my recipe :) 
You will need:
a large bucket with a lid
2 4lb boxes of baking soda
a 3 lb tub of oxi clean
1 box of washing soda
1 box of borax
3 bars of Dr. Bronnors organic vegan soap
 {I did rose, lavender & eucalyptus}  
{I know there are only 2 bars of soap in the pic.. oops!}
Put the grating atatchment on your cuisinart {Or use a cheese grater}
& grate your bars of soap
Pour grated soap into a bowl or onto a plate just for a moment..
Put the regular attatchment on your cuisinart 
& pour your soap shreds back in
Pulse the soap shreds until they look like parmesan cheese :) 
Pour all ingredients into your big bucket
I added half a bottle of purex laundry booster crystals. 
this is optional & not necessary
But they smell so yummy
& they dont irritate G's skin, so i went ahead & added them
Mix it up really well
I got on the floor & used my arms to mix it up 
& you're done!! 
You only need to use 1-2 Tablespoons per load!
Put a portion of your detergent into a smaller container for easier access.
{Im kind of partial to jars}


We really like this detergent. 
It seriously works just as well as our other expensive detergent 
It gets all the poo stains out of our diapers {Sorry TMI}
& it makes all of our other laundry sparkley clean & so yummy smelling!
Best part,  it only costs $25 to make 
& it will last us almost a whole year!! 

$25 a year vs. $360 a year?
I think the DIY detergent wins :)