Monday, October 31, 2011

{32 weeks & Pumpkin Carving}

{32 weeks}
32 weeks! Were almost there! only 8 weeks to go... wow. I can hardly wait :) 

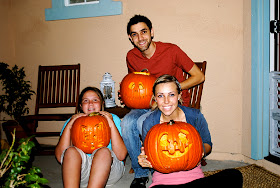
Since we have been married, right before halloween, we have my little sister over & we carve pumpkins.
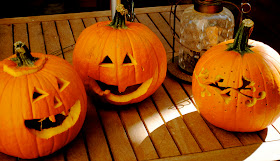
It has been a fun tradition! Here is a pic from last year:

This year, our friend jeremy joined us as well! It was his first time carving pumpkins. Can you believe it?! We had a blast carving our pumpkins :) My sister & I carved our own & the boys wanted to share a pumpkin. Here are some pics from last night!:

Happy Halloween!

Friday, October 28, 2011

{DIY Painted Burlap Wall art}

{A Unique Piece of art for Giuliana's room}
Remember our "List of things to do before baby?" We're really getting quite a bit of it done! Yesterday i crossed off #8: Paint Canvas for babies room.  Im really excited about this one :) I have been trying to decide what to paint for a long time! This is what i decided to do:
A nice size canvas
Some burlap
Paint 
Paint brush
* I was able to do this project with items we already had. I had Leftover burlap from our Ruffle christmas tree skirt, I found the canvas at goodwill for $5 a long time ago {I cleaned it up so it was like new!}, & we already had the paint in our garage from previous paint projects. 
Cut your burlap to the size you want. I wanted it to look jagged & not fill the canvas. So this is what my burlap looked like after i cut it. 
Take your burlap & do a basic sketch of what you are going to paint..
Get your paint ready..
Set up your paint station. My paint station is our garage, as you can see, our garage floor is covered with random paint :) 
Begin painting your burlap!
Once you have finished & your burlap is dry, secure your burlap to the canvas. To do this, i used twine. Tie a knot at the end of a long pice of twine.
Thread the twine through the bak of your canvas & burlap with a yarn needle.
Thread through again to make an "X" pattern to make it quite secure. Do this on all four corners & wherever else you feel is necessary.
Last but not least, hang your art! It looks lovely in Our babies room over her crib. William & i have put lots of love & hard work into her room. I love the unique touches it has with her art,  her Doily lamp, & many other projects we have worked on. I cant wait to sit in that room with her in my arms, rather than sitting there alone, looking at an empty crib,  like i do now. 
Giuliana, you are so loved, & you have blessed our lives in so many ways already, & we havent even met you yet! You will be an amazing little girl, im so sure of it. Just wait until you arrive, you will be snuggled & kissed like there is no tomorrow! 

“For you created my inmost being; you knit me together in my mother’s womb. I praise you because I am fearfully and wonderfully made; your works are wonderful, I know that full well. How precious to me are your thoughts, O God! How vast is the sum of them! Were I to count them, they would outnumber the grains of sand.” (NIV) Psalm 139:13 -14, 17, 18

Happy crafting my friends! 


Wednesday, October 26, 2011

{A trip to the Gilbert Historical museum}

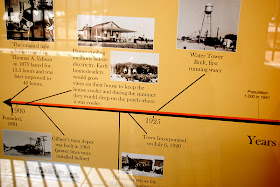
I have lived in Gilbert now for about 8 years, & my husband has lived here pretty much his whole life. In this past 8 years, there are so many place i have wanted to visit that i just havent! One of them was the Gilbert Historical Museum. Its a museum in the heart of downtown Gilbert with exhibits about the town of Gilbert's history. William & i finally had an excuse to take part of the day & go visit this museum. William has a project due in one of his classes,  where he has to write a report about certain places throughout Gilbert, & the museum was one of them. We were excited to get to go see this museum, as it was Giulianas first trip to the museum as well :) I think she liked it, she sure was jumping around a lot as we read some of the signs to her. We got really excited when the man at the front desk told us it was ok to take as many pictures as we wanted. There was some pretty cool stuff in there! 

Tuesday, October 25, 2011

{31 weeks & a baby shower}

{31 weeks}
Well folks, here we are at 31 weeks already! This means only 9 more weeks to go! {That is, if our sweet little girl decides to keeping cooking that long} As we get closer to her arrival, we get more & more excited, anxious, nervous, & scared all at the same time. Our lives are going to change so much, & were finally getting to a place where we have kind of grasped that concept. Our friends & family have been so wonderful, showing their love & support as we prepare for this little one to arrive. I am so thankful!

On sunday, some friend got together & threw me a baby shower! All of my closest friends were there :) It was so sweet & special.
{My best friend Julie, My sister sarah, me, My sisters' friend Jamie}
{My mother in law, me, My mommy}
The decorations were so beautiful! & everyone looked so great! It was really nice to be surrounded by all of the people i care about & love. 

My husband & I brought everything home from the shower & brought it into the babies room, & all i could do was cry. Seeing all of these little outfits & shoes & hairbows & bottles & blankets, makes it really feel real! & i can imagine holding our sweet little girl in my arms, wrapped in the sweet gifts our friends were so generous to give her. 

I am so anxious to meet our little girl.. I can barely contain it! 
Thank you so much to everyone that was at the shower & helped with the shower. What a huge blessing.
We love you all! 


Saturday, October 22, 2011

{Sparkling cranberries}

Every year around Thanksgiving & Christmas time, My mother in law makes a very yummy treat. She makes Sugared cranberries. They are to die for! The perfect mixture of tart & sweet. I always look forward to them every year. This year, william & i got  the hankering for them a little early & decided to try & make them ourselves. They turned out pretty yummy! {Not near as yummy as my mother in laws though :) } 

Sparkling Cranberries
1. In a small pot, combine your 2 C of water & 2 C of sugar. Heat until all sugar is dissolved
2. Pour 2 cups of cranberries in a heat safe container
3. pour your hot sugar water over the cranberries.
4. Cover the container & place in the fridge over night.
5. The next day, drain the sugar water from the container. 
{You can save this if you want & use it as a sweetener for tea}
6. pour your cranberries into a bowl with lots of sugar. I dont have an exact measurement. we just kind of put as much sugar as we thought looked good :) 
7. Toss the cranberries in the sugar, trying to coast every single one with a thin layer of sugar. 

8. Pour your sugared cranberries onto a pan or another surface to dry for about 2 hours. 
9. Place your sparkling cranberries in a bowl, & enjoy! They are delicious :) 

Happy Saturday! 

Wednesday, October 19, 2011

{30 weeks}

just 10 more weeks until we meet our little girl! 
It is so hard to believe that we will be holding our little sweetie in our arms so soon.
Just thinking about it makes me want to cry sometimes {Pregnancy hormones i guess..}
I am excited to see what our future has in store. Sometimes it is scary to think about, because we dont know what to expect, but at the same time it is exciting. Our lives are going to change so much in the next 10 weeks. We both have so many different emotions, feelings & thoughts... We just want her to be here already! But then we think about how much we still have to do to be ready & we feel like we need more time. I feel like an emotional roller coaster in general the last few weeks. Lately i get so grouchy & tired &William has been so good with me. Somehow he manages to lift my spirits & keep me laughing even when i feel so sad {& dont really know why}. I am so lucky to have such a patient & loving husband.  He is going to be such a wonderful daddy, i cant wait to see. 

We are excited to meet you Giuliana! Keep growing nice & big for mommy & daddy.
We Love you! 

Tuesday, October 18, 2011

{DIY Diaper strap}

This post is for the mamas out there {& soon to be's}
Everyone loves a neat & Organized Diaper bag. When it is organized & clean, it makes it so much easier to get to the things you need quickly!
One project i have been working on, to keep our diaper bag organized, is a diaper strap.
A diaper strap wraps around a stack of diapers & your wipie container & keeps them all tightly & neatly together, so that when it comes time to change a diaper, you simply pull your diaper kit out of your diaper bag, instead of digging around. 
This photo was my inspiration:
Now for those of you that regularly follow my blog, you know that i like ruffles :) {DIY Ruffle butt onesies, DIY Ruffle Christmas tree skirt, DIY ruffle burp clothes} ...
So, of course on my version of this diaper strap, i added ruffles. It is not necessary to add this if you dont want to though!
Here is my tutorial:

{DIY Diaper strap}
You will need:
A rotary board & cutter
Fun fabric
A sewing machine & pretty thread
Velcro
A pretty button
A needle & thread
Fold your fabric in half, & cut to desired Length & width.
{I cut mine 3in wide & 23in long}
23in long may be too long for some. 
I did this length because we are doing cloth diapers & they are a little more bulky than throw away diapers. 
Pin your fabric so that it is easier to hem the edges
{Forgot to take a before pic oops! but you get the idea :) }
Hem the edges of your fabric.
 I also did some extra stitches throughout the middle of the fabric, to add some fun texture. 
Next, Cut your velcro to size.
{I cut mine to about 5in}
Pin your velcro to either side of your strap. Make sure that the velcro matches up before you sew it on. 
{Again, forgot to take a before pic! But this is what it looks like after it is sewed on :) }
To make a ruffle:
Cut some fabric to twice the length of the strap.
Hem the edges
Set your machine to a looser stitch {Like a 3} and do a stitch down the whole length of the fabric strip
After you do this, you are ready to start making your ruffle.
 Seperate the bottom thread and begin pulling the fabric into a ruffle on the bottom thread. 
Do this until you get the whole line of fabric all ruffly. 

Pin your ruffle onto your original strap & use your machine to sew it on.
Pull all of the pins out of your ruffle. It looks so pretty & Girly! 
Next, pick a pretty button to add some extra flare to your strap.
Again, this part is not really necessary, it just adds a little glam :)
Using your needle & thread, hand-sew your button onto the strap.
& you're done!
To use:
Pull out some diapers & your wipies case..
Stack the diapers & case in the very middle of your diaper strap..
Secure the velcro around your stack & you are ready to go! 
Place your organized diaper kit into your diaper bag 
nice & Cozy :) & Organized! & Pretty! Check check check!

Happy Tuesday!